
Just-in-time (JIT) access
 A workflow for EPM for Windows and Mac
A workflow for EPM for Windows and MacAudience: IT / Security Administrators | Management & Stakeholders
Important informationThis document is designed to give you an overview of what Endpoint Privilege Management for Windows and Mac (EPM-WM) can do in this scenario. It is not a one-size-fits-all guide. Every organization has a unique environment, existing policies, and specific use cases to address. The steps here are intended to illustrate the general approach. Treat this as a starting point and adapt the steps to suit your setup.
Scope of this guide
This document provides a step-by-step workflow for implementing Just-in-Time (JIT) access in BeyondTrust Endpoint Privilege Management (EPM) for Windows and Mac cloud environments. JIT access is a security model in which elevated privileges are granted only on request, for a defined duration, and are automatically revoked when no longer needed.
JIT access is a critical component of a mature privileged access strategy. It eliminates the standing administrator accounts that represent one of the most targeted attack vectors in enterprise environments, replacing them with time-limited, audited, and approved privilege grants that expire automatically.
Prerequisites
Before beginning this workflow, confirm the requirements are in place.
- BeyondTrust EPM cloud licence (Windows & Mac). Active subscription covering endpoint privilege management for Windows and/or macOS
- Management console admin access. Account with at least PolicyAdministrator and JIT Settings Admin rights
- EPM agent deployed on endpoints. EPM Windows/Mac agent installed and reporting to the cloud console
- Workstyle policies in place. At least one active Workstyle policy exists per platform before enabling JIT on it
- Approver accounts identified. Individuals who will approve JIT admin requests are known and have console access
JIT Admin Access and JIT Application Access have separate configuration paths. This document covers both. You may choose to implement one or both depending on your requirements.
Why JIT access matters
Permanently elevated accounts are a primary target for attackers. If a user with local admin rights is compromised via phishing, malware, or credential theft, the attacker immediately has admin-level access to that endpoint and potentially to connected systems. JIT access removes this standing risk by ensuring that elevated privileges exist only for the duration of a specific, approved task.
Workflow summary
The six steps cover the full configuration lifecycle for JIT access in EPM for Windows and Mac. Steps 1-5 are performed in the management console and on endpoints. Step 6 covers the ongoing operational management of active JIT sessions.
Complete these steps in order. Otherwise, configuration might not be successful.
| Step | Stage | Purpose |
|---|---|---|
| 1 | Configure JIT Admin Access settings | Enable JIT Admin Access globally and configure default session durations and approval mode. This activates the JIT infrastructure that all subsequent steps depend on. |
| 2 | Set Permissions for JIT Access Management | Assign console roles (Settings Admin, Approver, Viewer) to the appropriate individuals. Enforces separation of duties so no single person can both configure and approve JIT access. |
| 3a | Policy config - Admin access on Workstyles | Enable JIT Admin Access on the target Workstyle and set Workstyle-level duration overrides and approval requirements for the endpoint group. |
| 3b | Policy config - App access | Add per-application elevation rules in the Workstyle. Defines which applications can be elevated, the match criteria, privilege level, and whether approval or justification is required. |
| 4 | Manage JIT Access Requests (Approver) | Approvers review pending JIT requests in the console, evaluate the business justification, and approve or deny. Notes added here enrich the audit trail. |
| 5a | Access Request – Admin (End User) | End users submit a JIT Admin Access request from the EPM client, providing a justification and desired duration. Elevated access begins immediately upon approval. |
| 5b | Access Request – Application (End User) | End users trigger JIT Application Access by launching a targeted application. EPM intercepts the launch and prompts for justification or approval before elevating the process. |
| 6 | Session management | Governs the active session lifecycle: automated notifications, early termination by the user or an administrator, and full audit logging of all session activity. |
STEP 1 Configure JIT Admin Access Settings
The first step is to enable and configure the global JIT Admin Access feature in EPM. This activates the JIT infrastructure that all subsequent steps depend on. Until this setting is enabled, the JIT option will not appear in Workstyle configurations and users will not be able to submit requests.
Why This Step Matters
Enabling JIT Admin Access at the global level switches EPM from a passive privilege management model to an active request-and-approval model for administrator rights. It also activates the supporting notification and session tracking infrastructure. This is the master switch that enables the entire JIT capability across your managed endpoints.
Configuration options
When enabling JIT Admin Access, you will configure the following settings:
| Setting | Description | Recommended Default |
|---|---|---|
| Admin Access Enabled | Toggle to enable JIT admin access globally | Enabled |
| Default Session Duration | The pre-filled duration shown to users in the request form | 2 hours |
| Maximum Session Duration | The longest session a user can request (cap enforced by policy) | 8 hours (or per policy) |
| Auto-Approval | Whether requests are approved automatically or require a manual approver | Requires Approver (recommended) |
| Session Expiry Warning | Time before expiry at which the user receives a notification | 15 minutes before expiry |
How to
- Log in to the BeyondTrust EPM cloud management console using an account with administrator credentials.
- Go to the Configuration menu.
- Select Just-in-Time (JIT) Access Settings from the configuration options.
- Select the Admin Access tab and select the toggle JIT Admin Access Integration.
- Configure the default and maximum session duration values to align with your organization's security policy.
- Set the approval mode. For most organizations, Requires Approver is recommended. Auto-approval may be appropriate for low-risk environments or break-glass scenarios.
- Configure the session expiry warning period.
- Save your changes. The console will confirm that JIT Admin Access is now active.
WarningActivating JIT Admin Access at the global level does not immediately change any end-user experience. JIT must also be activated within a Workstyle (Step 3) before users can make requests on managed endpoints.
STEP 2 Set permissions for JIT access management
EPM uses a role-based access control model to govern who can configure JIT settings, who can approve requests, and who can observe activity. This step assigns the appropriate roles to the relevant administrators and approvers. Correct permission assignment is essential for operational integrity: approvers must be different individuals from those who can modify policy settings.
Why this step matters
Separation of duties is a key control in any privileged access setup. By assigning distinct roles for settings management, request approval, and request viewing, you prevent any single individual from being able to both configure JIT policy and approve their own access requests. This is a critical control for audit and compliance purposes.
How to
- In EPM on Pathfinder, navigate to Settings > User Management.
- Identify the individuals who will administer JIT settings. Assign them the Request Manager role.
- Identify compliance or audit staff who need read-only visibility of JIT settings. Assign them the View Admin Access requests permission or View Application Access requests permission.
- Identify the individuals who will approve or deny user JIT requests. Assign them the Manage application Access requests role or Manage Admin Access requests role (depending on the type of JIT access). There should be at least two approvers to ensure coverage when individuals are unavailable.
- Identify IT operations who need visibility of requests but should not approve them. Assign them the View Admin Access requests permission or View Application Access requests permission
- Save all role assignments.
TipConsider naming a primary and secondary approver for each team or geography. Document the approver list outside the console (in your CMDB or IT runbook) so it is accessible during an incident when the console may not be the first tool at hand.
STEP 3 Activate JIT access on Workstyles
A Workstyle is the core policy object in EPM for Windows and Mac. It defines the rules governing how applications and user sessions are handled on managed endpoints. JIT access must be activated within each relevant Workstyle before users assigned to that Workstyle can request or receive elevated privileges. This step covers both JIT Admin Access (Workstyle-level toggle) and JIT Application Access (Workstyle rules).
Why this step matters
Workstyles provide the per-policy, per-group granularity that allows JIT to be deployed selectively. You may want JIT Admin Access available to your IT support team but not to standard knowledge workers. You may want JIT Application Access to apply only to approved application categories. Workstyle-level configuration is where these distinctions are made.
3a: Enable JIT Admin Access on a Workstyle
Follow these steps to activate JIT Admin Access for users covered by a specific Workstyle:
-
Navigate to the Policies menu in the management console.
-
Select the policy that applies to the endpoint group you want to enable JIT Admin Access for.
-
Open the policy and navigate to the Workstyles tab.
-
Select the target Workstyle.
-
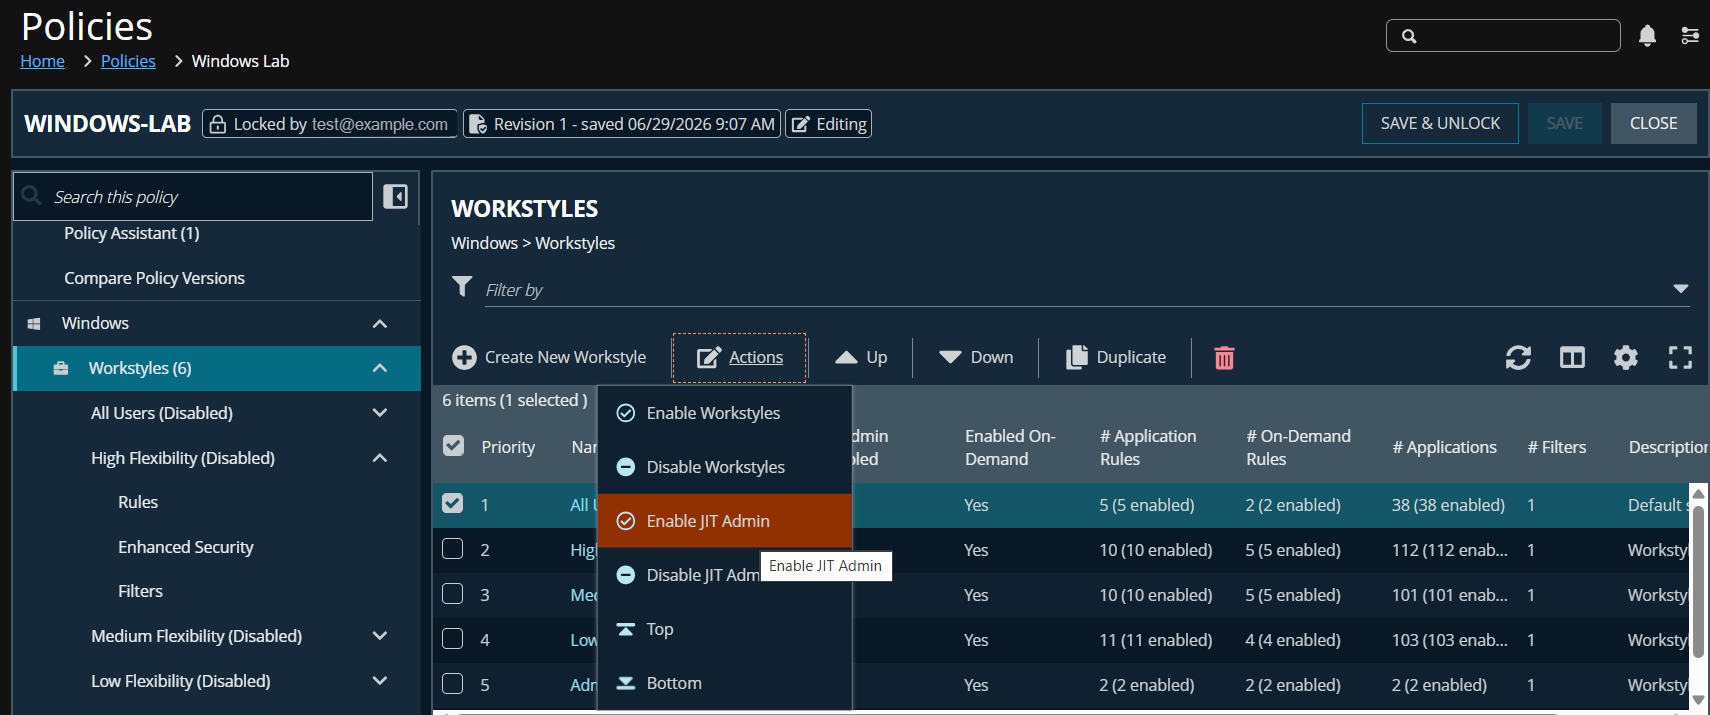
Locate the Just-in-Time Admin Access section within the Workstyle settings.
-
Set the JIT Admin Access toggle to Enabled.
-
Configure the Workstyle-level duration override if you want this specific Workstyle to have different maximum duration settings from the global default.
-
Optionally, configure a Workstyle-specific approval requirement (e.g., this group can self-approve, while others require a manager sign-off).
-
Save the Workstyle changes.
3b: Configure JIT Application Access via Workstyle Rules
JIT Application Access is configured through individual rules within a Workstyle. Each rule targets a specific application or class of applications:
- Within the same Workstyle, navigate to the Application Rules section.
- Click Add Rule to create a new application rule.
- Define the application match criteria. This can be based on file name, path, publisher, file hash, or a combination for stronger verification.
- Set the Action for the matched application to Allow (Run Elevated) or On-Demand (user must request elevation for this specific application).
- For On-Demand rules, configure whether an approval message, business justification, or challenge/response is required before the application is elevated.
- Set the privilege level for the elevated process (e.g., run as local administrator, or as a specified service account).
- Optionally, enable session recording for the elevated application to capture all activity during the elevated session.
- Save the rule and repeat for each application requiring JIT elevation.
You can create separate Workstyles for different user populations (e.g., Developers, Finance, IT Support) with different JIT rules appropriate to each group. Users are matched to Workstyles based on Active Directory group membership or other defined criteria.
STEP 4 Manage JIT access requests
Once JIT access is active on a Workstyle, end users can begin submitting requests for elevated privileges. This step covers the operational management of those requests from the perspective of the approver and the IT administrator. Efficient request management is essential to ensure that legitimate work is not blocked while maintaining the integrity of the JIT control.
Why this step matters
The value of a JIT program depends on the operational responsiveness of the approval workflow. If approvals take too long, users will find workarounds or raise excessive support escalations. If approvals are too permissive or not reviewed, the JIT control becomes a rubber stamp with no real security value. This step establishes the process and tooling that keeps the workflow both secure and operationally effective.
The Approval Workflow
A typical JIT Admin Access request follows this lifecycle:
| # | Stage | Description |
|---|---|---|
| 1 | User submits request | User opens the EPM endpoint app, selects Request Admin Access, provides a business justification, and specifies the duration needed. |
| 2 | Notification sent to approver | Designated approvers receive an email or in-console notification with the request details. |
| 3 | Approver reviews and decides | Approver logs into the EPM console (or uses email-based approval if configured) and approves or denies the request. |
| 4 | User notified of outcome | User receives a notification on their endpoint confirming whether the request was approved or denied. |
| 5 | Session begins (if approved) | Elevated privileges are applied to the user's session for the approved duration. |
| 6 | Session expiry notification | User receives a warning notification before the session expires. |
| 7 | Automatic privilege revocation | At the end of the session, elevated privileges are removed automatically. The user returns to standard access. |
Manage requests
- In the navigation menu, select Just-in-Time (JIT) Access Management.
- Review the list of pending requests. Each request shows the user, the endpoint, the requested duration, and the business justification provided.
- For each request, click View Details to see the full details.
- Select Approve Request to grant the access, or Deny Request to reject it. Optionally, add a note explaining the decision (recommended, especially for denials).
- For denied requests, communicate to the user via the appropriate channel (email or direct message) to explain what alternative steps they can take.
- Review the history of closed (completed, expired, or denied) requests regularly to identify patterns that may indicate policy adjustment is needed.
STEP 5 User request process
This step describes the experience from the end user's perspective and provides the operational guidance needed to support users in making JIT access requests effectively. Understanding the user-facing workflow is important for both administrators (who will support users) and for the user communication materials developed in parallel.
Why this step matters
A JIT program only succeeds if users understand how to use it and trust that it supports rather than obstructs their work. Confusion about the request process leads to helpdesk calls, shadow IT workarounds, and user frustration. Clear guidance at this step reduces friction and reinforces the value of the security program.
5a: Request JIT admin access
The following is the standard process for a user requesting full admin access on their Windows or Mac endpoint:
- On the managed endpoint, locate the BeyondTrust EPM client application in the system tray (Windows) or menu bar (Mac).
- Right-click (Windows) or click the EPM icon (Mac) and select Request Admin Access.
- In the request dialog, enter a Business Justification explaining why admin access is needed. This justification is visible to the approver and is logged for audit purposes.
- Select the Duration for which admin access is required. Options range from 5 minutes to 24 hours (subject to the maximum set in the Workstyle policy).
- Click Submit. The request is sent to the designated approver(s) immediately.
- A notification displays on the endpoint when the request is approved or denied. If approved, admin access begins immediately.
5b: Request JIT application access
For applications covered by On-Demand JIT Application rules, the experience is slightly different:
- Attempt to run the application as normal. EPM intercepts the launch and displays a prompt.
- The prompt may ask for a Business Justification, a reason code, or a challenge/response (depending on the Workstyle rule configuration).
- Complete the required fields and click OK or Submit.
- If the rule requires approval, the request is sent to the approver and the user waits for a notification. If the rule is configured for self-approval, the application launches immediately with elevated privileges.
- The application runs with the configured elevated privilege level for its process lifetime. When the application is closed, the elevation is automatically removed.
TipEncourage users to request the minimum duration they actually need and to end the session early (see Step 6) if their task completes sooner. Shorter sessions mean a shorter window of elevated exposure if the endpoint is compromised.
STEP 6 Session management
Session management covers the lifecycle of an active JIT privilege session from the moment it is approved through to its expiry or early termination. Effective session management protects the organization during the elevated-privilege window and ensures the audit record is complete.
Why this step matters
Even within an approved JIT session, the endpoint is operating at elevated privilege and represents a more attractive target. Session management controls such as notifications, activity logging, and early termination capabilities ensure that the JIT window is as contained and observable as possible.
Session notification behavior
EPM sends automated notifications to users at key points in their JIT session:
- Session start: Confirmation that elevated privileges have been applied and the session timer has begun.
- Mid-session reminder (optional): A configurable mid-point notification reminding the user of their remaining time.
- Expiry warning: A notification sent at the configured warning interval (default: 15 minutes) before the session expires, giving the user time to save work.
- Session end: Notification confirming that elevated privileges have been removed and the user has returned to standard access.
Ending a session early
Users can terminate their own JIT admin session before the scheduled expiry:
- Open the BeyondTrust EPM client application on the endpoint.
- Select End Admin Session (or equivalent option in the current version of the client).
- Confirm the action when prompted. Elevated privileges are removed immediately.
Administrators can also remotely terminate a JIT session from the management console:
- Navigate to the JIT Access Management page in the console.
- Locate the active session in the Active Sessions view.
- Click Revoke or End Session next to the relevant session.
- Confirm the action. The user's elevated privileges are removed at the next policy enforcement cycle (typically within seconds).
Session logging and audit
All JIT sessions are automatically logged by EPM. The following information is captured for every session:
- Requesting user account and endpoint
- Request timestamp and approval timestamp
- Approver identity and any notes added during the approval
- Approved session duration and actual session end time (whether by expiry or early termination)
- All privileged commands or actions performed during the session (if session recording is enabled in the Workstyle)
Session logs are retained according to your configured log retention policy. Ensure this period meets your compliance requirements before activating JIT across production endpoints. Common requirements are 90 days (operational) to 12 months (regulatory compliance).
Updated 27 days ago
