
Jump Policies | PRA Cloud
What are Jump Policies?
Jump Policies are configurations that control the access schedule for Jump Items, determining when they can be accessed.
How are Jump Policies useful to my organization?
Jump Policies allow administrators to manage when certain Jump Items are available, ensuring that access aligns with organizational needs, security requirements, or specific time frames. This helps maintain control and compliance over remote access activities.
How do I access the Jump Policies page?
- Use a Chromium-based browser to sign in to your Privileged Remote Access on-prem URL.
This URL is provided in the BeyondTrust welcome email and includes your site URL followed by /login. - From the left menu, click Jump.
The Jump Clients page opens and displays by default. - At the top of the page, click Jump Policies.
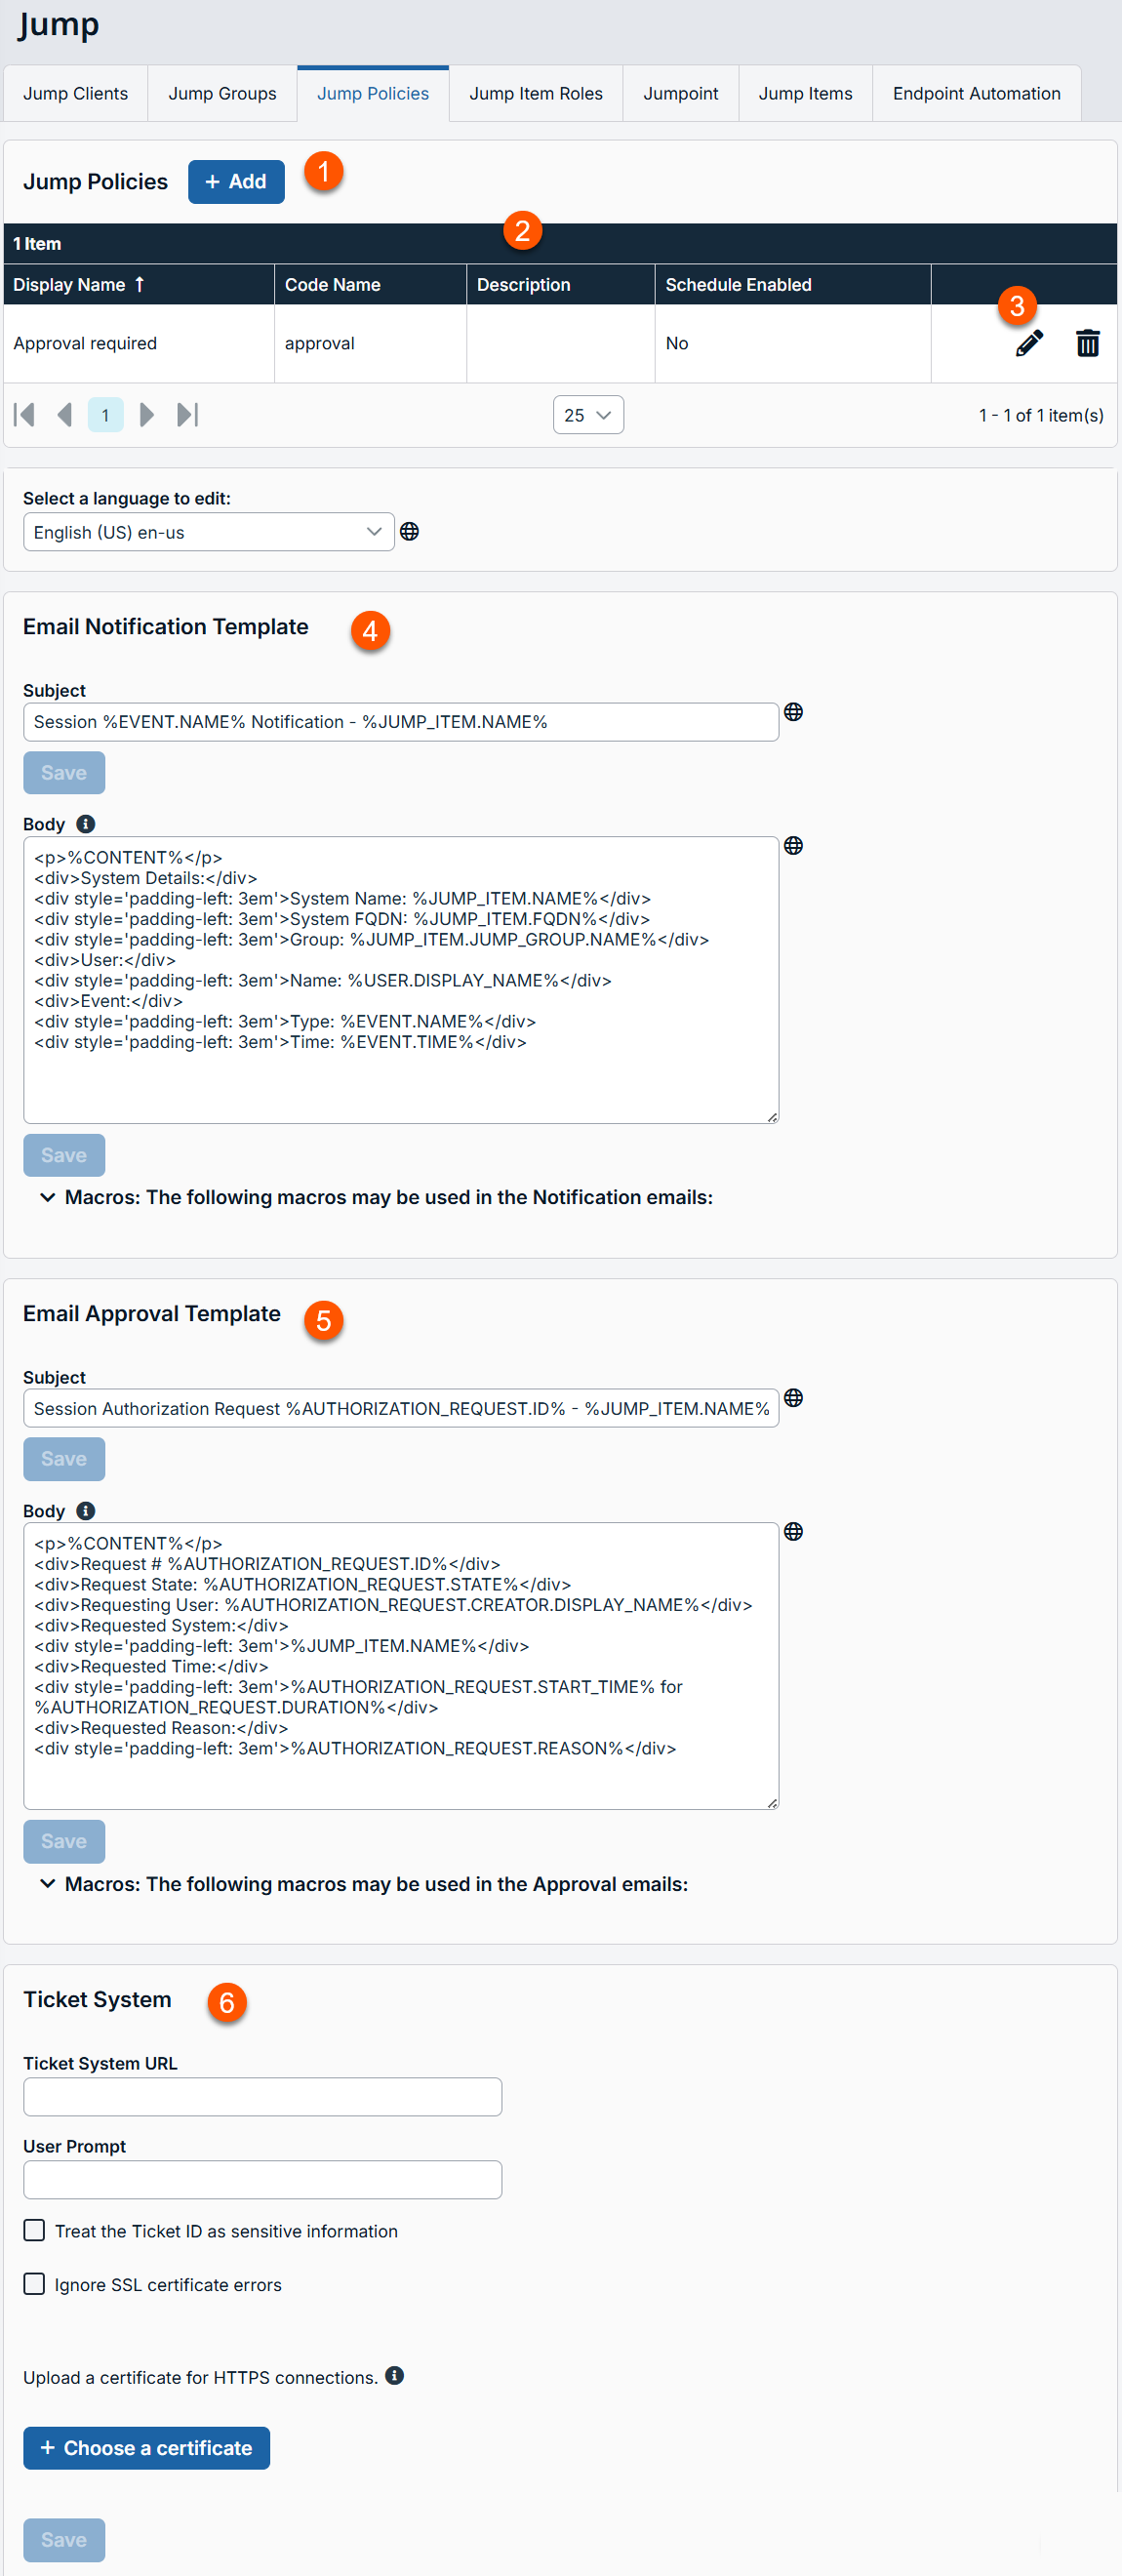
The Jump Policies page displays.
-
Add: Adds a Jump Policy.
-
Jump Policies columns: Lists Jump Policies columns.
Jump Policies columns
- Display Name: Unique name of the Jump Group.
- Code Name: Set a code name. If not provide, one is automatically assigned.
- Description: Add a note to summarize the purpose of the policy.
- Scheduled Enabled: Setting for Jump schedule.
-
Email Notification: Template for email notification.
-
Ticket System: Use with a ITSM ticketing system.
Jump Policies
Jump Policies are used to control when certain Jump Items can be accessed by implementing schedules.
Add a Jump policy
-
At the top of the page, click + Add.
The Add a Policy page displays.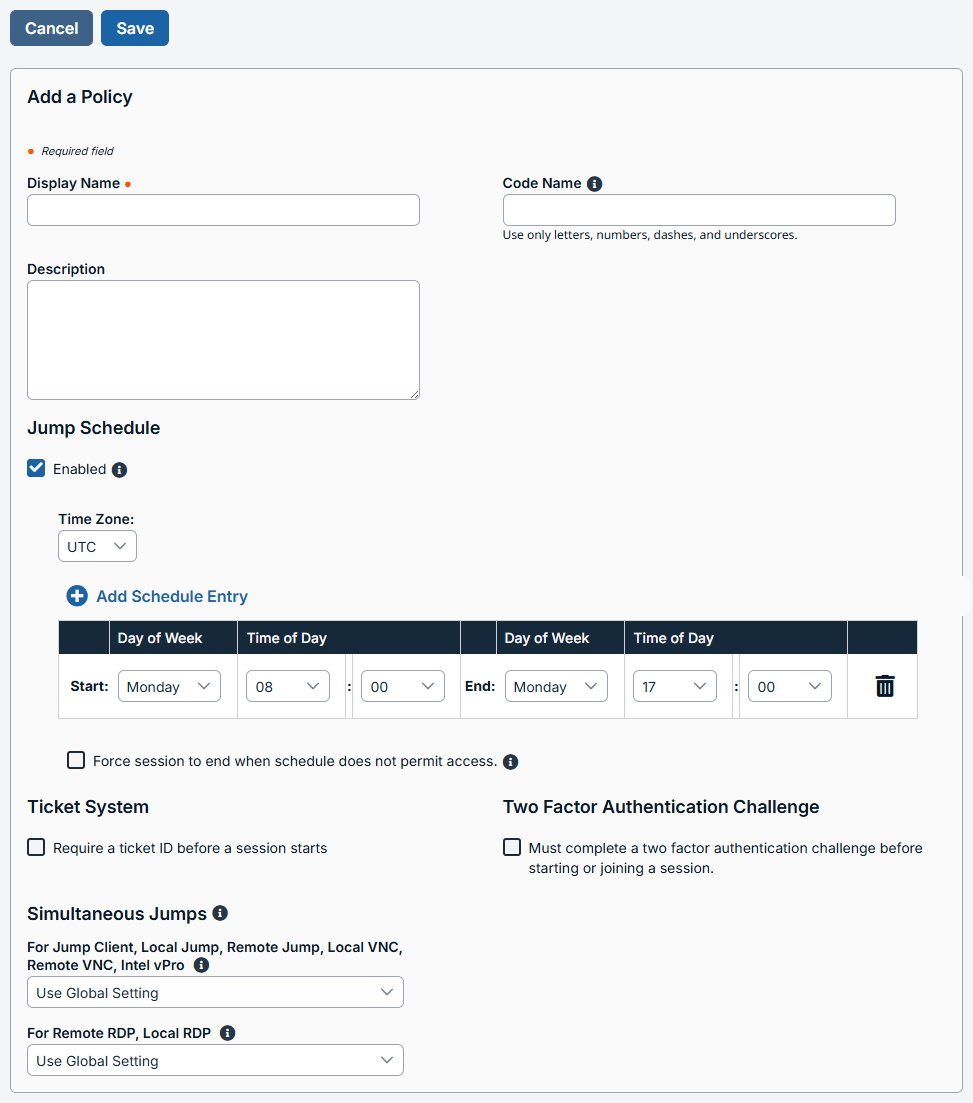
-
Enter a Display name. This name should help users identify this policy when assigning it to Jump Clients.
-
Enter a Code name for integration purposes. If you do not set a code name, one is created automatically.
-
Enter a Description to summarize the purpose of this policy.
-
To configure a Jump Schedule to define when Jump Items under this policy can be accessed, click the Enabled checkbox, and then:
- Set the time zone you want to use for this schedule.
- Click Add Schedule Entry to add one or more schedule entries.
- For each entry, set the start day and time and the end day and time.
- If stricter access control is required, select the Force session to end when schedule does not permit access checkbox. This forces the session to disconnect at the scheduled end time. In this case, the user receives recurring notifications beginning 15 minutes prior to being disconnected.
ExampleIf, for instance, the time is set to start at 8 PM and end at 5 PM, a user can >start a session using this Jump Item at any time during this window but may >continue to work past the set end time. Attempting to re-access this Jump Item >after 5 PM, however, results in a notification that the schedule does not permit a >session to start. If necessary, the user may choose to override the schedule >restriction and start the session anyway.
-
To require a ticket ID before a session starts, select the Require a ticket ID before a session starts checkbox.
-
To require an end-user to confirm their identity using a multi-factor authentication challenge before starting or elevating a session, select the Must complete a two factor authentication challenge before starting or joining a session checkbox.
-
Select an option from the Configure Simultaneous Jumps for Jump Client, Local Jump, Remote Jump, Local VNC, Remote VNC, Intel vPro list:
-
Use Global Setting: The simultaneous Jump setting configured on Jump > Jump Items > Jump Item Settings is used.
-
Join Existing Session: Provides a way for multiple users to gain access to the same Jump Item without an invitation to join an active session by another user. The first user to access the Jump Item maintains ownership of the session. Users in a shared Jump session see each other and can chat.
-
Join Existing Session: When selected, an option to apply the setting to copies of Jump Clients displays.
- If the options is checked, a user can join a session that was started from another copy of a Jump Client in a different Jump Group. Session permissions are based on the original Jump Client that started the session.
- If not checked, a user cannot join a session that was started from another copy of a Jump Client, unless it is the same Jump Group.
-
Disallow Jump: Ensures only one user can Jump to a Jump Item at a time. Only an invitation by the user who originated the session can allow for a second user to access the session.
-
-
Select an option from the Simultaneous Jumps For Remote RDP, Local RDP:
-
Use Global Setting: The simultaneous Jump setting configured on Jump > Jump Items > Jump Item Settings is used.
-
Start New Session: Provides a way for multiple users to gain access to the same Jump Item without an invitation to join an active session by another user. For RDP, multiple users may gain access to a Jump Item, but each starts an independent session.
-
Disallow Jump: Ensures only one user at a time can Jump to a Jump Item. Only an invitation by the user who originated the session can allow for a second user to access the session.
-
-
Click Save at the top of the page.
Edit a Jump Policy
- Locate the Jump Policy you want to edit from the list.
- Click
 .
.
The Edit Policy page displays. - Edit the policy details. The details you can edit are the same as the Add a Policy page details.
- Click Save at the top of the page.
Delete a Jump Policy
- Locate the policy you want to delete from the list.
- Click
 to delete the policy.
Email notification template
You can use this section to create a template for email notification by following these steps:
- In the Subject field, type the intent of the notification.
- Click Save.
- In the Body field, type the details of the notification.
- Click Save.
Emails are sent using a mailto: URL which has different length limitations on different platforms. Exceeding this limit may cause generated emails to appear truncated or a failure to launch the email software. Consider this limitation when using Macros, which count towards this limit when expanded.
Macros for email notification template
| Macro | Purpose |
|---|---|
| %CONTENT% | The main content for the request notification. For example, "A session has started." |
| %EVENT.NAME% | A string representing the name of the event. For example:
|
| %EVENT.TIME% | The time the event occurred according to the Secure Remote Access Appliance. |
User Properties
| Macro | Purpose |
|---|---|
| %USER.DISPLAY_NAME% | The display name of the user that started the session. |
Jump Item Properties
| Macro | Purpose |
|---|---|
| %JUMP_ITEM.NAME% | The name of the Jump Item. |
| %JUMP_ITEM.COMMENTS% | The comments of the Jump Item. |
| %JUMP_ITEM.COLLECTION.NAME% | The name of the Jump Group the Jump Item is associated with. |
| %JUMP_ITEM.TAG% | The tag value as configured on the Jump Item. |
| %JUMP_ITEM.FQDN% | The fully qualified domain name of the Jump Item. This is supported only for Jump Clients. |
Email approval template
You can use this section to create a template for email approval by following these steps:
- In the Subject field, type the intent of the approval.
- Click Save.
- In the Body field, type the details of the approval.
- Click Save.
Macros for email approval template
| Macro | Purpose |
|---|---|
| %CONTENT% | The main content for the request notification. For example, "A new session authorization request has been created. Click here to respond to the request." |
Authorization Request Properties
| Macro | Purpose |
|---|---|
| %AUTHORIZATION_REQUEST.ID% | The unique ID of the request. |
| %AUTHORIZATION_REQUEST.STATE% | The state of the request. For example:
|
| %AUTHORIZATION_REQUEST.CREATOR.DISPLAY_NAME% | The display name of the user that created the request. |
| %AUTHORIZATION_REQUEST.START_TIME% | The request window start date and time. |
| %AUTHORIZATION_REQUEST.END_TIME% | The request window end date and time. |
| %AUTHORIZATION_REQUEST.DURATION% | The duration of the request window. For example, "2 hours". |
| %AUTHORIZATION_REQUEST.REASON% | The reason for the request provided by the user. |
| %AUTHORIZATION_REQUEST.APPLIES_TO% | This expands to Anyone with Access or the creator's display name depending on the jump policy's setting. |
Jump Item properties
| Macro | Purpose |
|---|---|
| %JUMP_ITEM.NAME% | The name of the Jump Item. |
| %JUMP_ITEM.COMMENTS% | The comments of the Jump Item. |
| %JUMP_ITEM.COLLECTION.NAME% | The name of the Jump Group the Jump Item is associated with. |
| %JUMP_ITEM.TAG% | The tag value as configured on the Jump Item. |
| %JUMP_ITEM.FQDN% | The fully qualified domain name of the Jump Item. |
Ticket system
If your service requests use ticket IDs as part of the change management workflow, you can connect your ticket IDs to endpoint access in BeyondTrust by following these steps:
- In the Ticket System section, for the Ticket System URL field, type the URL for your external ticket system. The URL must be formatted for either HTTP or HTTPS. If an HTTPS URL is entered, the site certificate must be verified for a valid connection.
- In the User Prompt field, type the dialog text you want access console users to see when they are requested to enter the ticket ID required for access.
- If your company's security policies consider ticket ID information as sensitive material, check the Treat the Ticket ID as sensitive checkbox.
If this checkbox is checked, the ticket ID is considered sensitive information and asterisks are shown instead of text. You must use an HTTPS Ticket System URL. If an address with HTTP is entered, an error message appears to remind you HTTPS is required.
When this feature is enabled, you cannot bypass issues with SSL certificates by checking the Ignore SSL certificate errors box. This means you must have a valid SSL certificate in place. If you try to check the Ignore SSL certificate errors box, a message appears stating that you cannot ignore SSL certificate errors.
When the Ticket ID is sensitive, the following rules apply:
- Both the desktop and the web access consoles show asterisks instead of text.
- The ticket is not logged anywhere by the access console.
- Click the Ignore SSL certificate errors checkbox if you do not want to include certificate validation information when it contacts your external ticket system.
- Click Choose a certificate to upload the certificate for the HTTPS ticket system connection to your Appliance. If your certificate is uploaded, the Appliance uses it when it contacts the external system. If you do not upload a certificate and the Ignore SSL certificate errors checkbox below this setting is checked, the Appliance optionally falls back to use the built-in certificate store when sending the request.
When the Ignore SSL certificate errors box is checked, the Appliance does not include the certificate validation information when it contacts your external ticket system.
Certificates must be in PEM, DER, or CRT format. If no certificate is uploaded, the appliance's built-in certificate store is used to establish trust.
- Click Save.
Jump Schedule
You can set a Jump schedule by selecting the Enabled checkbox. Once enabled, this checkbox defines when a user is allowed to start a session and when Jump Items under this policy can be accessed.
To set a schedule, complete the following steps:
- From the Time Zone field on the Jump Policies page, ensure the proper time zone is selected.
- Click Add Schedule Entry.
- Add a start day and time and an end day and time.
- To add additional schedules, repeat steps 4 and 5.
If the time is set to start at 8 PM and end at 5 PM, a user can start a session using this Jump Item at any time during this window but may continue to work past the set end time. If you attempt to re-access this Jump Item after 5 PM, it results in a notification that the schedule does not permit a session to start. If necessary, the user may choose to override the schedule restriction and start the session anyway.
- To require stricter access control, enable the Force session to end when schedule does not permit access checkbox.
This forces the session to disconnect at the scheduled end time. In this case, the user receives recurring notifications beginning 15 minutes prior to the session being terminated.
Ticket system
If your service requests used external ITSM or ticket ID system, you can use a ticket system to generate a ticket ID before a session starts. To do so, select the Require a ticket ID before a session starts checkbox.
Two factor authentication challenge
For additional security, you can select the Two Factor Authentication Challenge checkbox. When this setting is enabled, the end-user is required to confirm their identity using a multi-factor authentication challenge before starting or elevating a session.
Jump Notification
To notify a user that a Jump session is either started or ended, select the appropriate Notify recipients when a session starts or Notify recipients when a session ends checkbox.
Jump Approval
If the Require approval before a session starts option is checked, the following happens:
- When a user attempts to start a session with a Jump Item that uses this policy, a dialog box prompts the user to enter a request reason, time, and duration for the request.
- An approval message is sent to the designated recipients via email and to the access console if the recipients are logged in.
This option cannot be used if a Jump Schedule is enabled.
Disable Recordings
If checked, sessions started with this Jump Policy are not recorded even if recordings are enabled on the Configurations > Options page. This affects Screen Sharing, User Recordings for Protocol Tunnel Jump, and Command Shell recordings.
Simultaneous Jumps
Simultaneous Jumps provide a way for multiple users to gain access to the same jump item without having to be invited to join an active support session by another user.
By using the For Jump Client, Local Jump, Remote Jump, Remote VNC field, you can create new sessions. The options you can choose are the following:
| Value Name | Description |
|---|---|
| Join Existing Session | Provides a way for multiple users to gain access to the same Jump Item without an invitation to join an active session by another user. The first user to access the Jump Item maintains ownership of the session. Users in a shared Jump session see each other and can chat. Users can join a session that was started from another copy of a Jump Client in a different Jump Group. Session permissions are based on the original Jump Client that started the session. Once the first user is in a session, subsequent users are able to enter the session. The first user receives a notification that another user has joined the session, but the first user does not have an opportunity to deny access before other user joins. |
| Disallow Jump | Ensures only one user can Jump to a Jump Item at a time. Only an invitation by the user who originated the session can allow for a second user to access the session. |
| Use Global Setting | If this setting is selected, it uses the values that are configured on the Jump > Jump Items > Jump Item Settings page. |
From the For Remote RDP field, you can create new sessions which jump to a specific RDP Jump item. The options you can choose are the following:
| Value Name | Description |
|---|---|
| Start a New Session | Provides a way for multiple users to gain access to the same Jump Item without an invitation to join an active session by another user. For RDP, a new independent session starts for each user which jumps to a specific RDP Jump Item, and the RDP configuration on the endpoint controls any further behavior regarding simultaneous RDP connections. |
| Disallow Jump | Ensures only one user at a time can Jump to a Jump Item. Only an invitation by the user who originated the session can allow for a second user to access the session. |
| Use Global Setting | If this setting is selected, it uses the values that are configured on the Jump > Jump Items > Jump Item Settings page. |
Updated 7 months ago
