User management
As an EPM administrator, add users that will be working in the various areas of the application based on roles and responsibilities:
- Security administrators to look after policy
- IT administrators to look after configuration like SIEM integration or ServiceNow integration
For example, in an international corporate infrastructure, IT administrators might be assigned assets based on region. In this scenario, organize computers regionally in groups and the assign the IT administrator in that region to that group.
When creating accounts, consider the responsibilities of the user and use the role based access model of EPM to create groups and assign roles or permissions.
Roles and permissions
Starting in version 24.5, there are two ways to delegate access to EPM features:
- Use roles to assign permissions: Use builtin roles or create roles to assign permissions. A role is a group of permissions that can be assigned to one or more users.
- Customize permissions to delegate access: Assign the Standard user type to individually select permissions for a user.
Before creating user accounts
Before adding accounts, set up the following:
- All users that you want to add to EPM must exist in your authorization provider. Currently, Azure B2B and OpenID Connect are supported providers.
- Add a domain that can receive email notifications from EPM.
For Azure B2B, you must register an Azure tenant.
The User Management page
On the User Management page, create and edit users, roles, and identity provider groups. By default, the Users tab is selected.
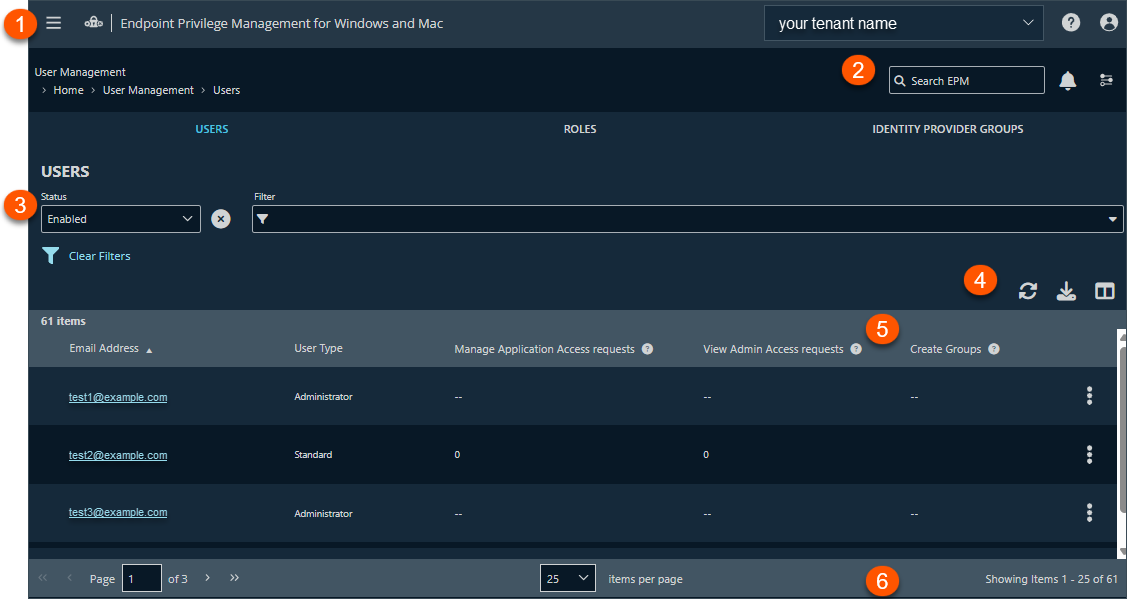
- Administration menu: Access Pathfinder administration pages if you are assigned as an administrator.
- Header: Enter keywords to run a global search across computer groups, policies, computers, and users, view your notifications, change your site language, change your time zone.
-
Filters: Click the drop arrow to select a filter type. The selected filter displays to the left of the drop-down. Click Clear Filters to remove all filters and search results.
Filter types
-
Email Address
-
Is Administrator
-
Last Seen
-
Language
-
-
List options: Click
 to refresh the list,
 ![Download icon in [%=Products.PMAb%] SaaS.](https://files.readme.io/0409dc72778b865c649d6bd0fc9d6042351367b265e483c1fde9404b45346d8f-icon-download.png) to download the list to a .csv file, and
to download the list to a .csv file, and  to select which columns to display on the page.
 -
Users list columns: Not all columns display in the image above.
Column names
- Email Address: The email account used to register the user.
- Manage Application Access requests: User can approve or deny JIT application access requests for the selected computer groups.
- View Application Access requests: User can view JIT application access requests for the selected computer groups.
- Manage Admin Access requests: User can approve or deny JIT admin access requests for the selected computer groups.
- View Admin Access requests: User can view JIT admin access requests for the selected computer groups.
- Assign Policy to Groups: The number of computer groups the user can assign policy to.
- Edit Groups: The number of computer groups the user can edit.
- View Groups: The number of computer groups the user can view information for.
- Analyze Groups: The number of computer groups the user can view data analytics on.
- Edit Policies: The number of policies the user can edit.
- View Policies: If a policy is locked, this displays the period (in days or months, if longer
than 3 weeks) when the policy was last locked. - View Settings: The number configuration settings the user has permission to view.
- Last Logged In: The time and date the user last logged on to the console.
- Create Groups: Indicates if the user has permission to create computer groups.
- Create Policies: Indicates if the user has permission to create policies.
- Edit Settings: Indicates if the user has permission to edit configuration settings.
- Status: The status of the user account: enabled or disabled.
- Language: The language preference selected in account preferences.
-
List navigation options: Navigate in the Users list.
